The Do's and Don'ts of Foundation Crack Sealing
Why Do Foundations Crack?
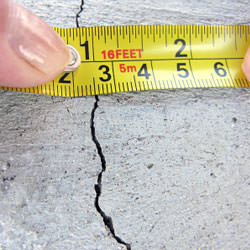
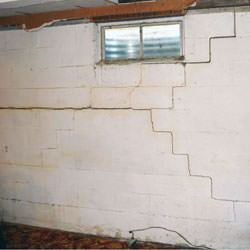
Foundation cracks form for a variety of reasons and will be noticable as:
- Horizontal or vertical wall cracks
- "Stair-step" or diagonal cracking
- Bulging, buckling foundation walls
- Pushing in at the bottom of the wall
- Sliding in at the top of the wall
In the New Hampshire and Massachusetts areas, the three main types of foundations we generally see are traditional poured concrete, block foundations, and what are called stone, or fieldstone, foundations. Other homes are also built on slabs. No matter what material your homes foundation may be composed of, one of the forms of cracks mentioned above may be visible somewhere within it's walls.
Perhaps the most common cause of cracks in a concrete foundation are formed as the concrete cures. This occurs when there is excess water used in the concrete mix, if the concrete dries too quickly, or if the material or location is not properly prepared. While these types of cracks are common, not all of them are alarming and require immediate attention.
Other times, cracks form when the subgrade soil is not properly compacted, or if material such as trees or roots are buried beneath the foundation. The soil in such cases is vulnerable to sinking, shifting or expanding, which means a lot of pressure is added to the foundation directly, rather than transferred into the earth surrounding the structure.
And lastly, sometimes water is the culprite. High water tables, or flowing water, can remove or shift soils, and so overtime as the soils are displaced, the foundation becomes less stable and cracks as voids are created underneath the footings.
Two Types of Foundation Cracks
No matter what the cause of the foundation crack me be, they can be categorized into two broad categories; static and moving. To put it simply, static means the foundation settled or moved slightly, resulting in a crack, and has since not moved very much (or at all). Or, something bigger, and worse is happening with your foundation. The crack has formed and is gradually growing wider, moving as the structure continues to sink or settle over time. When it comes to a moving crack, the issue at hand is not so much the foundation wall itself, but the soil surrounding it.
*It's worth mentioning here, this article will not discuss how to determine whether the crack is moving or static, or how to repair a foundation which may be settling or sinking. Instead, it will focus on how to properly seal the foundation crack itself.


Do's & Don'ts of Crack Sealing
No matter what has caused the foundation to crack, or whether it is moving or static, the crack should be sealed. Sealing the crack correctly will preserve the integrity of the wall and also prevent water from entering into the space within. In this article, we discuss crack sealing from the inside of the wall, as sometimes sealing from the outside is not an option.
During a number of our foundation inspections throughout New Hampshire and Massachusetts, we often come across a crack which had previously been sealed incorrectly, either by the homeowner or by a hired professional. So what does it mean to be sealed incorrectly?
The common mistakes we encounter are surface fills, such as putting caulking into the crack, or packing the crack with hydraulic cement. Both of these applications are non-permanent solutions to any crack seal job. While sometimes they may look like a job well done, in fact they are making the problem worse.
These are mistakes for 2 main reasons. The first being, over time cement or caulking will either erode or fall away, reopening the crack. The other reason these applications are not effective, is that they don't divert the water away from the wall, but rather end up acting as a dam. With the water being stopped and not allowed to move freely it can potentially cause further damage to the integrity of the wall, slowly eroding it away.

When our service professionals encounter a sealed crack which was done incorrectly, there are a few ways to address the situation.
- If the crack was sealed with caulking, we first remove the caulking, then grind out the crack and install our injection system. Sometimes this is a long tedious process, other times it goes fairly quickly. Once the crack is cleaned out and grinded to be a bit wider, we prep the area and inject a polyurethane foam.
- If the crack is packed with cement or foam, we install a flexispan system. To do this, we first cover the crack with a small bead of caulking, and lay in a piece of foam over the caulking the length of the crack. We then notch the slab floor and drill through the footing using long bits if necessary, allowing for water to be diverted from inside the wall cracks back down into the soils. The end of the foam is then pushed into the notch. Lastly, the entire span of the crack is sealed with Flexi Span caulk to complete the repair.
To properly seal a foundation crack, Erickson Foundation Supportworks uses two different methods, depending on the type of crack and the condition of the wall.
For a polyurethane injection system, we take the following steps:
- Grind out and clean the crack
- Using duct tape, lay strips up and directly over the crack leaving small gaps between them
- Using an injection foam, fill the bottom port and let sit for 5-10 mins. This allows for a solid base to be established for the remainder of the injection
- Continue injecting foam up the wall until entire crack is filled
- Wait approximately 45-60 mins for foam to activate and harden
- Cut down any humps of foam so they are just shallow of the surface of the wall
- Apply an even, smooth coat of Nexus Pro Caulking
- Install crack monitor at top of crack to monitor any movement of the walls
For a Flexi Span system, we take the following steps:
- Mark out a notch area at base of the crack
- Drill down through footing of foundation to allow water to be diverted away from wall
- Test that water can be drained
- Apply thin bead of caulking over original crack and/or failed crack job
- Unroll desired length of Flexi Span Foam and lay it over the bead of caulking, inserting the end of the foam into the notched slab
- Lay duct tape approximately 1/2" down either side of foam following the pattern of the crack/foam
- Apply Flexi Span Caulking over foam and onto duct tape
- Carefully peel duct tape away to create even, neat lines
- Install crack monitor at top of crack to monitor any movement of the walls

