Basement Flooding Due to Foundation Wall Instability in Dunbarton, NH
Challenge
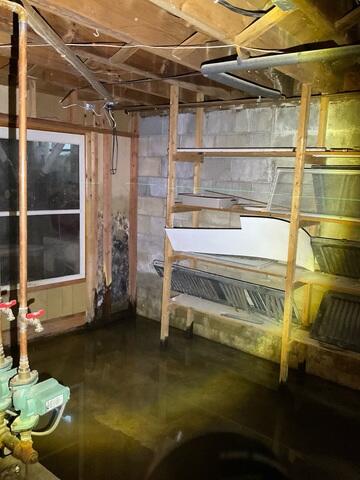
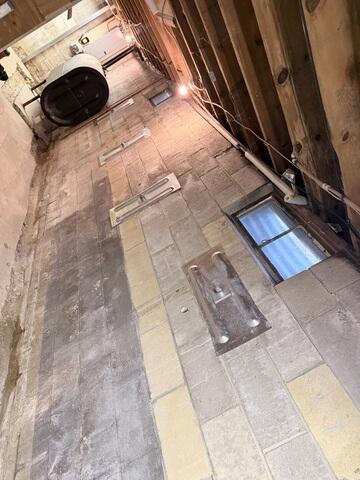
In Dunbarton, NH, a homeowner had been dealing with significant basement water intrusion for over a year. What began as occasional seepage gradually worsened, eventually escalating into frequent flooding. At times this left nearly a foot of water standing in the basement. Mold growth had begun to appear, and the existing sump pump could no longer keep up with the volume of water entering through foundation wall cracks, the cold joint, and a hole in the slab. During the inspection, our team also identified structural concerns, including a foundation wall deflecting nearly 0.75 inches and beginning to shear.
Concerned for the safety and integrity of his home, he reached out to Erickson Foundation Solutions seeking a comprehensive, long-term remedy. A Customer Care Specialist scheduled an inspection, followed by a detailed evaluation conducted by one of our System Design Specialists. After a thorough assessment, it was clear that the home required both a robust waterproofing system and structural reinforcement. To address all issues and ensure a dry, stable, and healthy basement environment, the following solution was recommended:
- 4 GeoLocks – Earth anchor system for stabilizing the bowing foundation wall
- 8 PowerBraces – Galvanized I‑beams to halt inward wall movement
- 135 ft of WaterGuard – Interior perimeter drainage system
- 28 ft of TrenchDrain – Surface drainage solution for high-flow areas
- SuperSump Pump System – Reliable primary sump pump for efficient water removal
- IceGuard – Failsafe for frozen or blocked discharge lines
- 55 ft of Discharge Line – Directs water safely away from the home
- SaniDry XP – High‑capacity dehumidification to control humidity and prevent mold
Solution
Arrival & Pre‑Installation Walkthrough
On the scheduled installation day, the foreman contacted the homeowner upon departure to confirm our arrival window. After greeting the homeowner, the crew completed a thorough walkthrough of the basement and exterior. We reviewed the scope of work, confirmed protection plans for flooring and belongings, identified utility locations, and addressed any remaining questions. Once expectations were aligned, the basement waterproofing and foundation repair work began.
Perimeter Preparation & WaterGuard® Sub‑Floor Drainage Installation
Objective: Intercept groundwater before it enters the basement and relieve hydrostatic pressure along the footing.
- Concrete Removal & Channel Creation:
- The crew carefully removed a controlled strip of concrete along the interior perimeter to create a dedicated trench for the WaterGuard® interior perimeter drainage system. Dust control and debris containment measures were used to protect the living space.
- Substrate Conditioning:
- The trench was cleaned and prepared to ensure proper grade and flow. Crushed stone was placed as a stable, free‑draining base to support the WaterGuard components.
- WaterGuard® Placement & Pitching:
- WaterGuard® was installed atop the foundation footing, ensuring a continuous, positive slope toward the sump pump basin. This configuration efficiently intercepts groundwater at the wall‑floor joint and conveys it through the system for controlled discharge, preventing seepage and reducing hydrostatic pressure against the wall.
- Integration with Sump System:
- The interior drainage was connected directly to the sump pump liner so that all collected water is directed to the pump for removal from the home.
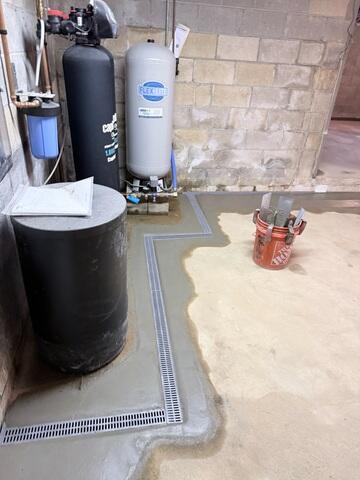
TrenchDrain™ Surface Drainage Around Fixed Utilities
Objective: Capture surface water where WaterGuard cannot be installed due to obstructions.
- Targeted Concrete Removal:
- Around immovable utilities (e.g., oil tanks, water heaters, sinks, or door thresholds), we precisely removed concrete to form a trench for TrenchDrain™.
- TrenchDrain™ Installation & Tie‑In:
- The TrenchDrain™ surface drainage system was set to collect water at the slab surface in these high‑flow or obstructed areas. It was then seamlessly tied into the WaterGuard network, creating one continuous path for water to reach the sump basin.
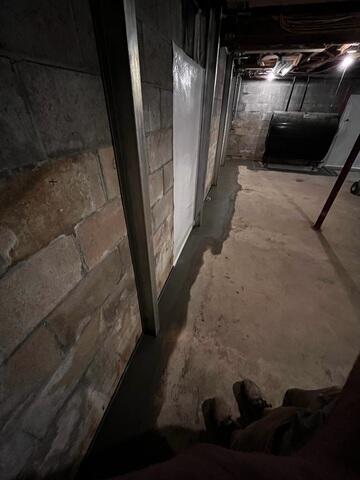
CleanSpace® Vapor Barrier on Moisture‑Vulnerable Walls
Objective: Control wall seepage and reduce basement humidity.
- Targeted Wall Coverage:
- CleanSpace® vapor barrier was installed on foundation wall sections identified as vulnerable to moisture intrusion, including cracks, cold joints, and porous areas.
- Moisture Management:
- Any water migrating behind the liner is directed into the WaterGuard system. This layered approach reduces ambient humidity, supports mold prevention, and enhances overall moisture control in the basement.
Sump System Integration: WaterGuard® → UltraSump® Liner
Objective: Ensure reliable, controlled evacuation of collected water.
- Direct Connection:
- WaterGuard® discharges directly into the UltraSump® sump pump liner, ensuring an efficient hydraulic path from collection to removal. This minimizes risk of overflow and increases system reliability during peak inflow events.
System Validation: Flood Test & Concrete Restoration
Objective: Verify performance and deliver a clean, durable finish.
- Flood Test:
- The system underwent a controlled flood test to confirm proper collection, flow, and discharge through WaterGuard®, TrenchDrain™, and into the sump system.
- Encapsulation in Concrete:
- Upon successful validation, all drainage components were encased in new concrete, restored flush with the surrounding slab. The floor was finished to a clean, level profile that integrates seamlessly with the existing surface.
UltraSump® Primary Pump with Battery Backup & SaniDry™ XP Dehumidification
Objective: Maintain a dry, healthy basement environment—even during power outages.
- UltraSump® Installation:
- The UltraSump® sump pump system features a high‑capacity, battery‑powered backup pump designed to maintain reliable water removal during power outages or primary pump failures—critical for flood prevention and resilience.
- SaniDry™ XP Integration:
- A SaniDry™ XP high‑capacity basement dehumidifier was paired with the sump configuration. The unit discharges automatically to the sump, maintaining low humidity to help prevent mold, musty odors, and wood rot in below‑grade spaces.
Exterior Discharge: Line Routing, IceGuard®, & Landscape Protection
Objective: Move water safely away from the home—reliably, year‑round.
- Discharge Line Excavation & Routing:
- Soil was carefully excavated to accommodate the extended discharge line, routed to a suitable daylight location away from the foundation. We minimized disturbance to turf and landscaping throughout the process.
- IceGuard® Freeze Protection:
- IceGuard® fittings were installed on the discharge line as a failsafe. If the line freezes or becomes blocked, engineered overflow ports allow water to discharge safely outside the home, protecting the sump system and reducing the risk of basement flooding in winter conditions.
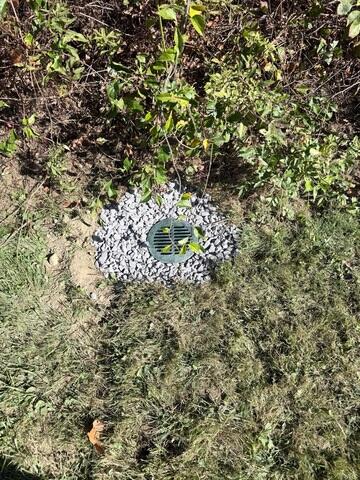
Bubbler Pot Termination for Controlled Dispersion
Objective: Disperse water discreetly, prevent puddling, and protect the lawn.
A bubbler pot was installed at the discharge terminus. Surrounded by crushed stone below grade, it promotes gradual infiltration into the soil, helping prevent surface pooling and soggy areas while maintaining the property’s appearance.
Structural Stabilization: PowerBrace™ I‑Beams for Bowing Wall
Objective: Halt inward movement and provide long‑term wall stabilization.
- Layout & Beam Installation:
- The PowerBrace™ system—galvanized steel I‑beams placed vertically along the affected wall—was installed to stop inward movement immediately.
- Tightening & Long‑Term Adjustment:
- Beams were anchored at the floor and ceiling joists. With periodic adjustment (as appropriate to site conditions), PowerBrace™ can help incrementally improve wall alignment over time while maintaining structural stability.
Earth Anchors: GeoLock® Rods, Anchors, Plates & Tensioning
Objective: Provide lateral restraint and improve wall alignment.
- Rod Installation:
- GeoLock® earth anchor rods were driven through the interior face of the bowing foundation wall and extended into a carefully excavated exterior trench.
- Anchor Placement in Load‑Bearing Soil:
- In the trench, GeoLock® earth anchors were attached to the rods and set against dense, load‑bearing soils to establish a stable counterforce.
- Interior Plate Mounting & System Lock‑Up:
- Inside the basement, GeoLock® wall plates were mounted to the rods and systematically tightened, transferring tension to the exterior anchors and locking the assembly together.
- Stabilization & Potential Realignment:
- The system stabilizes lateral movement. With appropriate tensioning (as site conditions allow), the wall can gradually move toward its original position.
Backfilling & Grade Restoration
Objective: Protect anchors and return the yard to its original condition.
After the GeoLock® installation was fully tensioned and verified, the exterior trench was carefully backfilled and compacted, restoring the area to original grade while ensuring the anchors remain supported by stable, compacted earth.
Final Quality Check, Cleanup & Homeowner Walkthrough
With basement waterproofing and foundation repair complete, the crew conducted a final inspection and cleanup. We reviewed each system with the homeowner—WaterGuard®, TrenchDrain™, CleanSpace®, UltraSump® with backup, SaniDry™ XP, IceGuard®, the discharge line and bubbler pot, PowerBrace™, and GeoLock®—including basic maintenance guidance and what to expect seasonally. The result is a dry, stable, and healthier basement with resilient, year‑round protection.
Project Summary
Crew Foreman: Ed N
Systems Installed: GeoLocks, PowerBraces, WaterGuard, TrenchDrain, CleanSpace, UltraSump, SaniDry XP