Walkway & Patio Trip Hazard Elimination for a Safety‑Focused Homeowner in Epping, NH
Challenge
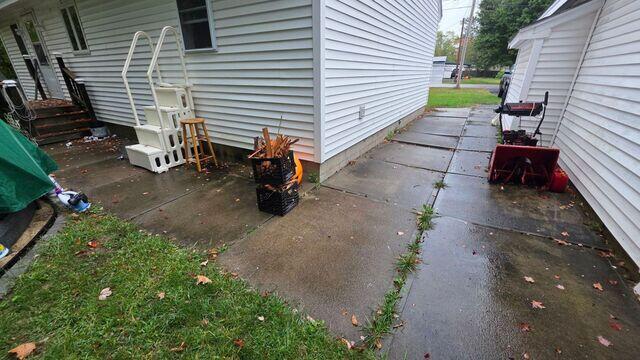
A homeowner concerned about aging in place reached out to Erickson Foundation Solutions to address significant trip hazards along the side and back walkways of his home. Several concrete panels had sunk, some by as much as 3.5 inches, creating unsafe height differentials, open joints, and pathways for water infiltration and soil washout. The objective was clear: lift, level, and stabilize the concrete to eliminate trip hazards and provide long‑term protection against future movement and water damage.
Our System Design Specialist completed a comprehensive site review, assessing the full extent of settlement, joint conditions, and drainage patterns around the walkways and patio. The inspection confirmed that multiple slabs had differential settlement and created hazardous elevation changes at control joints and panel edges. Several joints were open or deteriorated, providing a direct path for water to penetrate and erode the supporting soils. Based on the homeowner’s safety goals and the site conditions, we recommended a targeted concrete lifting, leveling, joint sealing, and surface sealing program designed for long‑term stability and durability. To precisely lift and stabilize the slabs, protect joints, and seal the surface for longevity, we specified:
- 83.4 lbs of PolyLevel – High‑density polyurethane foam to lift, level, and stabilize settled concrete
- 200 ft of NexusPro – Flexible, UV‑resistant joint/crack sealant to block water intrusion and soil washout
- 440 ft of SealantPro – Penetrating concrete sealer to resist water and harsh chemicals and support long‑term durability
Solution
Precision Re‑Alignment with Slab Jacks
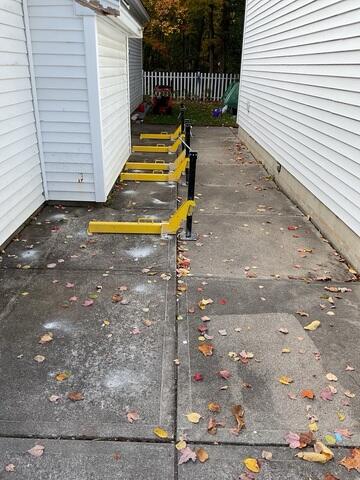
To correct the trip hazards and restore the proper walking plane, slab jacks were positioned at key lift points along the most affected panels. The jacks allowed our crew to incrementally and precisely re‑align each concrete section back to its intended elevation. This controlled mechanical support was critical to prevent over‑correction, to match edges smoothly at neighboring slabs, and to re‑establish correct pitches for surface drainage.
Controlled PolyLevel Injection for Uniform Lift & Stabilization
With the panels held in their target positions by the slab jacks, we drilled small, pea‑sized ports at strategic locations and injected high‑density PolyLevel polyurethane foam beneath the slabs. As the foam expanded, it occupied subsurface voids, delivering uniform lifting and bearing support across the underside of each slab. The expanding polyurethane not only raised the settled sections but also compacted and stabilized the soils immediately below the slab, reducing the risk of future resettlement. Because the lift is controlled and precise, the panels were brought to elevation without large, invasive demolition, and the small injection points were later patched to blend with the surrounding surface.
Long‑Lasting Joint Protection with NexusPro
Once elevations were corrected, we addressed the moisture pathways. NexusPro joint sealant was installed across all critical concrete joints (200 ft total) to block water intrusion and protect against soil erosion under the slabs. NexusPro’s flexible, UV‑resistant formulation is designed to withstand seasonal movement and sun exposure, unlike ordinary caulks that can dry out, crack, and lose adhesion. By sealing these joints, we cut off one of the main drivers of slab settlement: water infiltration and washout of supporting soils.
Surface Sealing for Durability with SealantPro
To provide comprehensive protection from the top down, we applied SealantPro across the concrete surfaces (440 ft total coverage as specified). SealantPro penetrates and bonds with the concrete matrix, creating a durable barrier that resists water penetration and harsh chemicals (such as de‑icers). During application, the product appears green to visually confirm even coverage, then cures to a clear finish so the concrete retains its natural appearance while gaining long‑term defense against moisture and contaminants.
Installation Process
Surface Prep & Layout
To begin the concrete repair and leveling process, the crew thoroughly cleaned all slab surfaces to remove dust, loose debris, and surface contaminants that could interfere with injection accuracy or product adhesion. Once the slabs were prepped, the team carefully mapped out all lift points and injection port locations. These placements were determined based on slab dimensions, thickness, the direction and extent of settlement, and areas where precise elevation matching was critical. Proper layout at this stage ensured that the forthcoming PolyLevel injections would distribute evenly and deliver controlled, predictable lifting.
Slab Jack Setup & Controlled Pre‑Lift
With the layout complete, slab jacks were positioned at strategic locations to control slab movement during the lifting process. These jacks allowed the team to perform a controlled pre‑lift, gradually bringing each sunken panel closer to its intended elevation before any foam was introduced. During this step, elevations were monitored continuously to ensure smooth transitions between slab edges and to maintain proper drainage slopes. Establishing this controlled pre‑lift ensured that the slabs would be ready to accept the PolyLevel foam with minimal stress and maximum accuracy.
Micro‑Port Drilling
Next, the crew drilled small, minimally invasive injection ports through the slabs using a precision masonry bit. These pea‑sized holes were placed exactly where previously mapped to support optimal foam flow beneath the concrete. Port spacing was carefully calculated to promote uniform distribution of PolyLevel foam under the slab, avoiding point‑loading and preventing uneven or unbalanced lifting. This meticulous drilling layout set the stage for a controlled, highly accurate lifting phase.
PolyLevel Injection & Real‑Time Elevation Control
With slab jacks engaged and injection ports prepared, the team began injecting high‑density PolyLevel beneath the slabs. The foam was introduced in small, controlled lifts, allowing technicians to monitor the rising slab in real time. Elevations were checked continuously, and slab jacks were adjusted as needed to prevent overshooting the target height. As the foam expanded, it filled voids, stabilized the underlying soils, and lifted the concrete panels to their precise final elevations. Once cured, the PolyLevel locked the slabs into place, creating long‑term stabilization and preventing future settlement.
Port Patching & Finish Work
After achieving the final lift, all injection ports were removed and carefully patched to match the surrounding slab surface. This finishing work ensured a clean, seamless appearance, leaving no visible evidence of the small access holes used during injection. The final finish blended naturally with the existing concrete, restoring a uniform and polished look to the walkways.
Joint Preparation & NexusPro Application
The crew then shifted focus to joint sealing. All joints and cracks were cleaned thoroughly to ensure strong adhesion for the NexusPro joint sealant. Once prepared, 200 linear feet of joints were filled with NexusPro, creating a continuous, flexible, water‑tight seal along all slab joints and cracks. This high‑performance sealant not only prevents moisture intrusion and soil washout but also resists UV exposure and seasonal expansion and contraction, ensuring long‑term protection.
SealantPro Surface Sealing
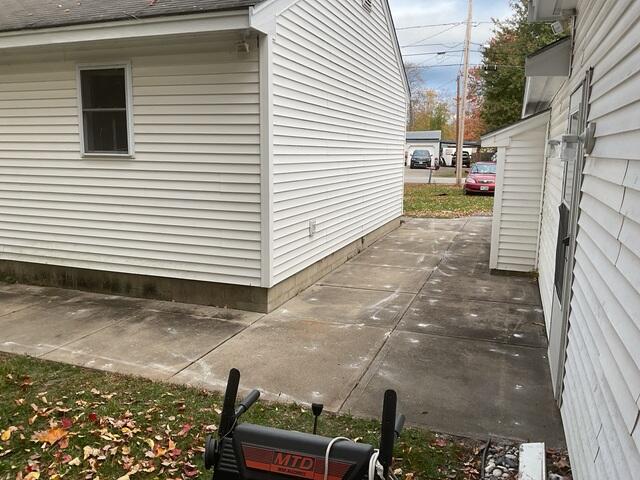
After the joints were protected, the concrete surfaces were cleaned again to prepare them for surface sealing. SealantPro was applied across the walkway and patio, covering 440 feet as specified. During installation, SealantPro appears green. This temporary tint ensures full coverage and even application. As it cures, the product transitions to a clear, natural finish that preserves the slab’s appearance while dramatically improving durability. SealantPro creates a penetrating, chemical‑bonded barrier that shields the concrete from water penetration, de‑icing salts, and everyday wear.
Final Quality Check & Walkthrough
To conclude the project, the crew performed a detailed quality inspection, verifying slab elevations, confirming NexusPro adhesion, and ensuring smooth, even SealantPro coverage. Once all elements passed inspection, the team completed a final walkthrough with the homeowner, reviewing the restored surfaces, explaining maintenance guidelines, and answering questions. By the end of the visit, the homeowner had safe, level, and fully protected concrete walkways ideally suited for aging in place with confidence.
Project Summary
Crew Foreman: Dan D.
System Design Specialist: Mitch M.
Systems Installed: PolyLevel, NexusPro, SealantPro